|
By this time in the competition, everyone's rug looked so different that it was hard to imagine that they were the same pattern. Amazing to see what different colors will do! 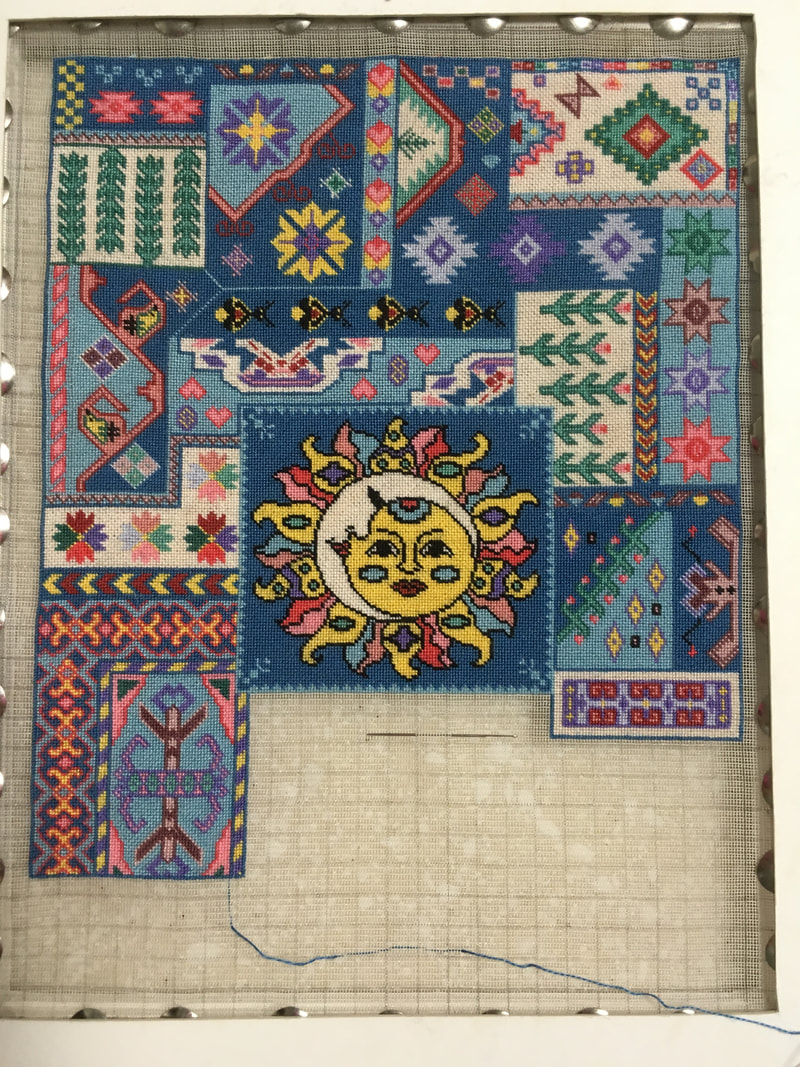 October's installment filled in the right side of the rug. I decided to use the diagonal motif to change the colors and did dark blue on one side and light blue on the other. I also tied in one section with another already stitched and made them the same so that the motifs blended. Can you see the one that matches the one I have stitched in October? 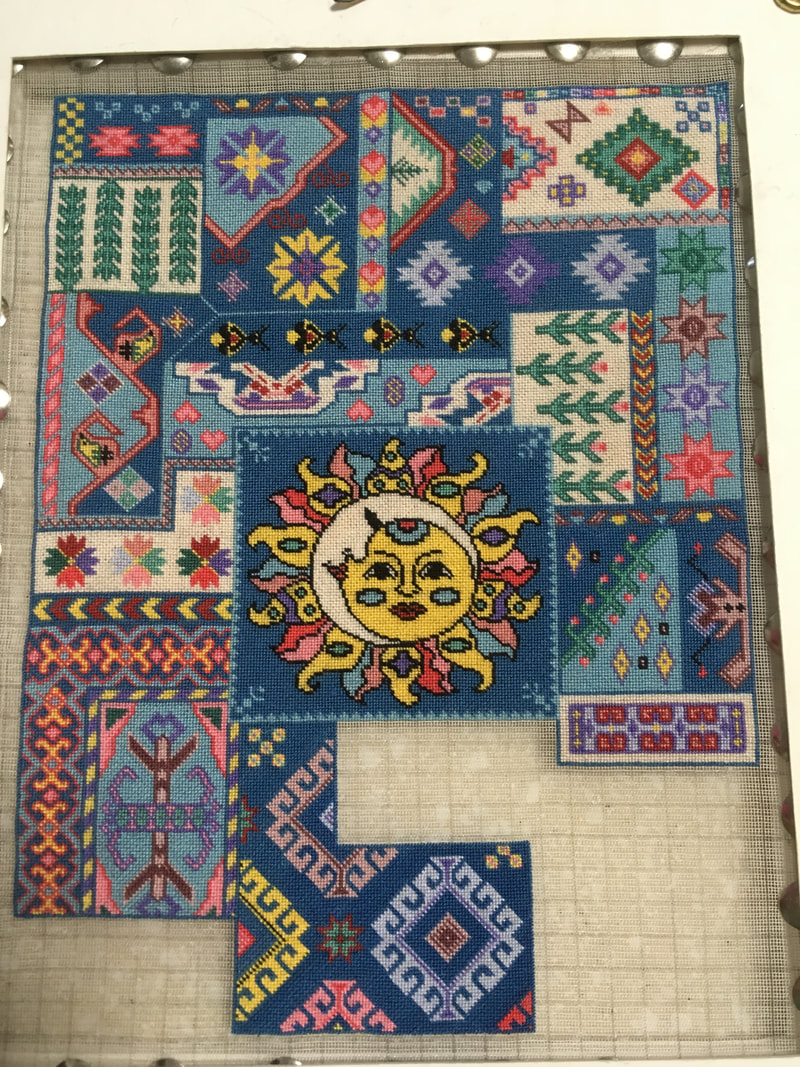 November's installment was a very odd shape. I was very intrigued to see what Natalia would fill in next.  December's installment has almost finished the rug. I decided to go with the same idea as I did in October and change the colors on either side of the diagonal motifs. 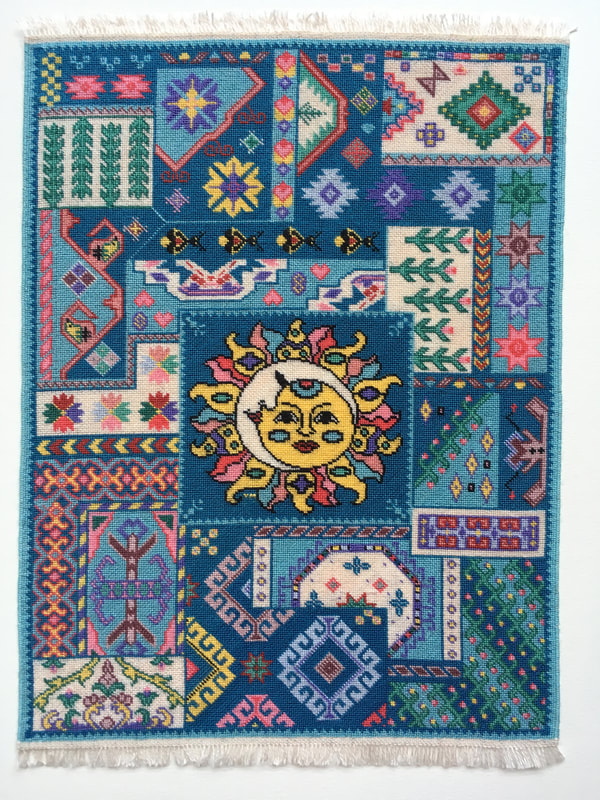 Here is the rug with January's installment finished and the fringe put on. It was such a lot of fun to stitch and I learned a lot while doing it. This one I spent quite a bit of time blocking it to make sure it was straight before finishing the sides.
0 Comments
The next few months of the competition were uneventful and I enjoyed learning more about putting colors together. When I received a piece of the pattern, I would input it into my design program then experiment with the colors I had chosen to see how it would look in different combinations. I would then send pictures of my choices to my daughters and husband and ask them to vote on which they liked the best. I would stitch the one that had the majority of votes. 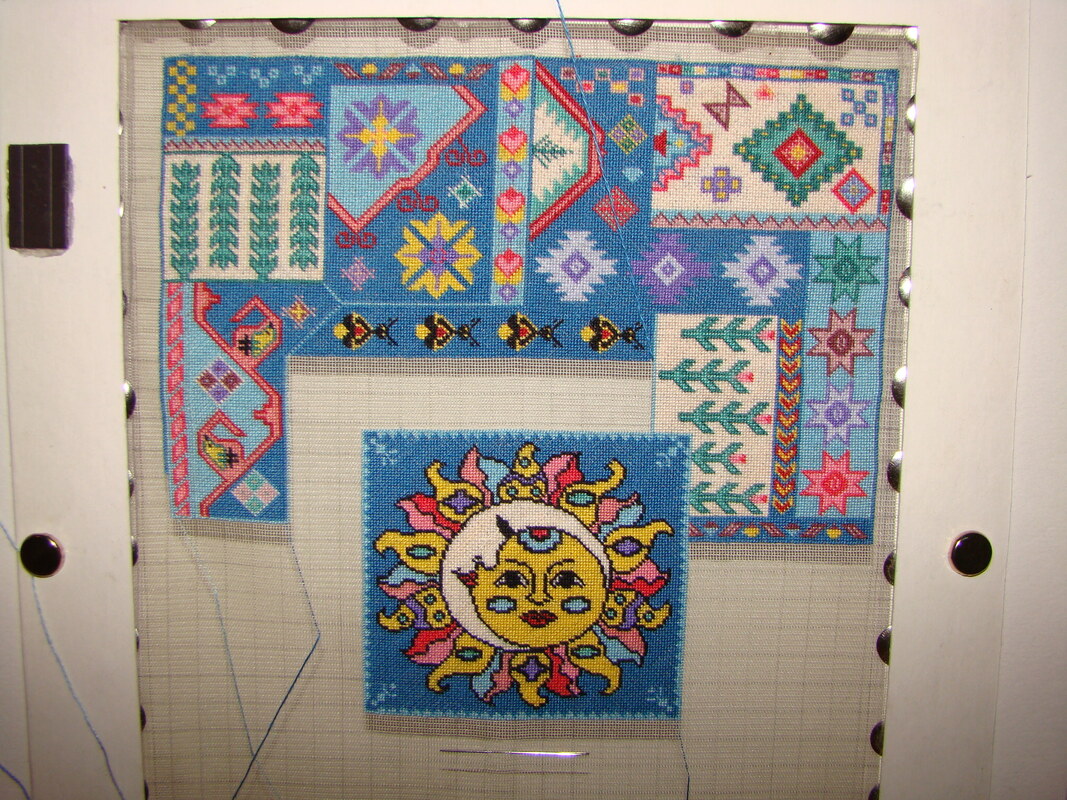 June's installment. For this month, we were asked to design something to fit inside a square in the middle that Natalia outlined for us. I decided to chart a sun/moon motif that was inspired by a Mexican Tile that I saw. The colors of the tile were almost exactly the colors that I was using so it seemed to fit my project very well. 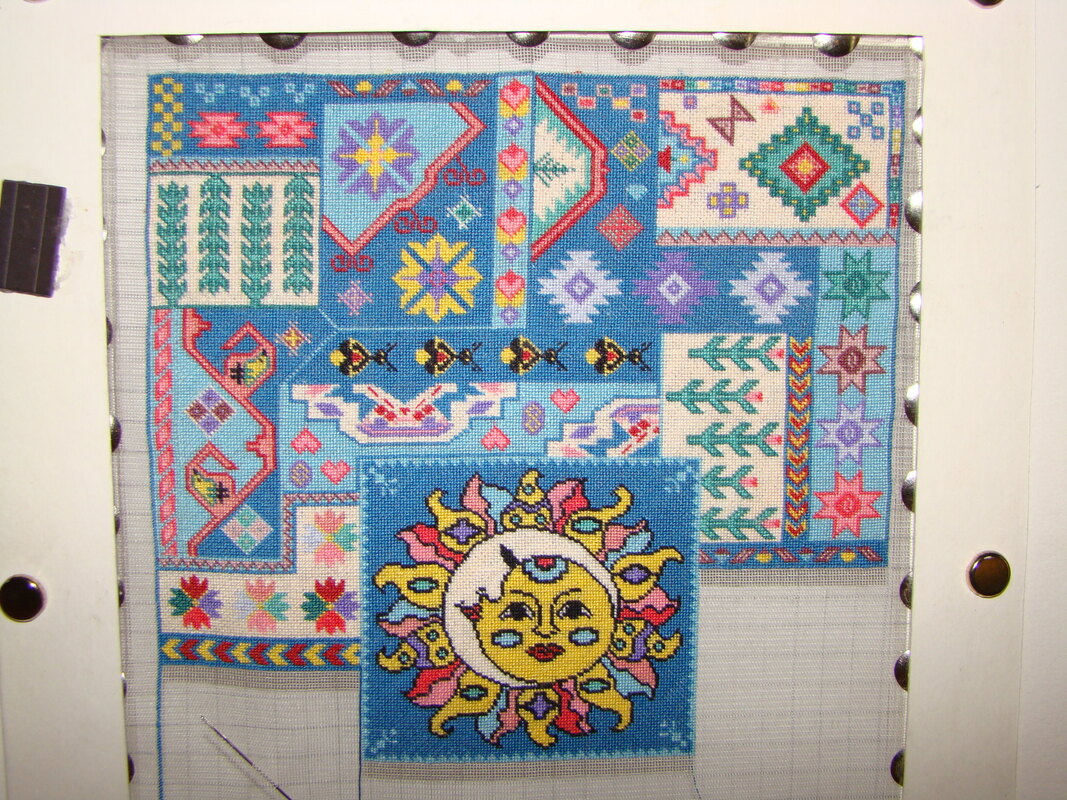 Since it was Summer, Natalia released both July and August's installments together. This way we could work on our projects over the summer at our own pace. The rug is really starting to take shape and I looked forward to seeing what came next. 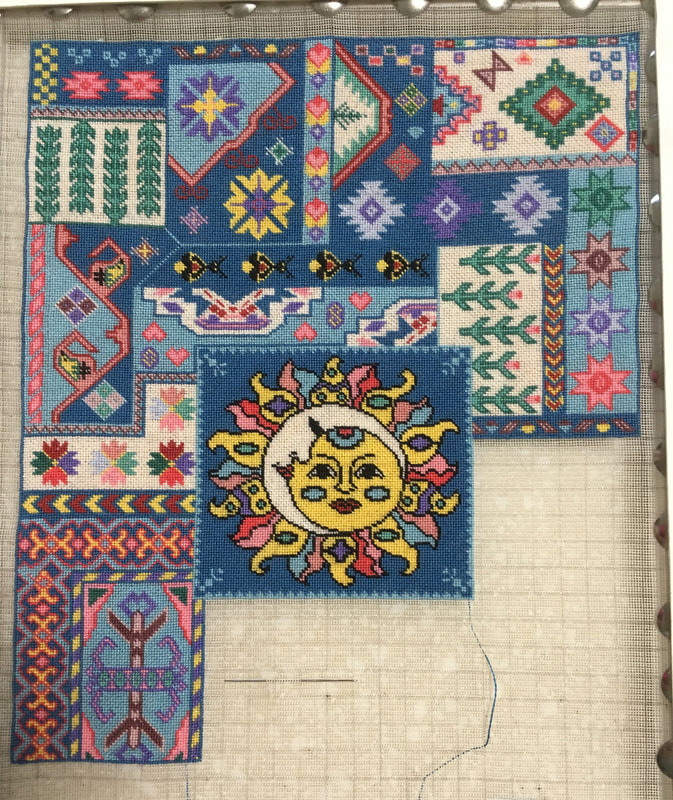 September's Installment completed. I experimented with using the more bright colors in the rug to complete this section and really liked the results. It looked as if there wasn't much more to do before the rug was finished.
In February of 2018, I entered a contest run by Natalia Frank of Natalia's Fine Needlework. The contest was to complete a petitpoint rug on 40 count or higher. Natalia would release one section of the rug design each month and we could choose the colors we wished to use. I had only done one petitpoint project so far and wanted to learn more about it so I thought the competition would be a great way to do so. The competition would last a year and at the end of it, voters would decide who won. Below are photos of the first 4 months of stitching. 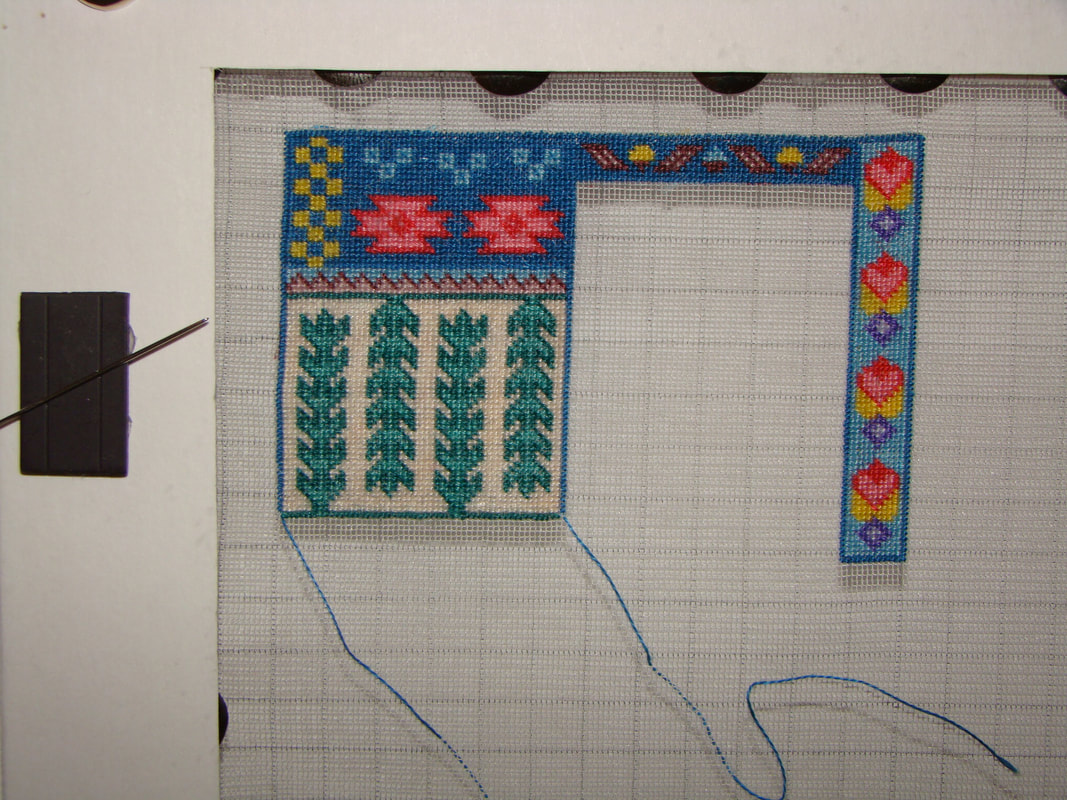 February' installment  March's installment 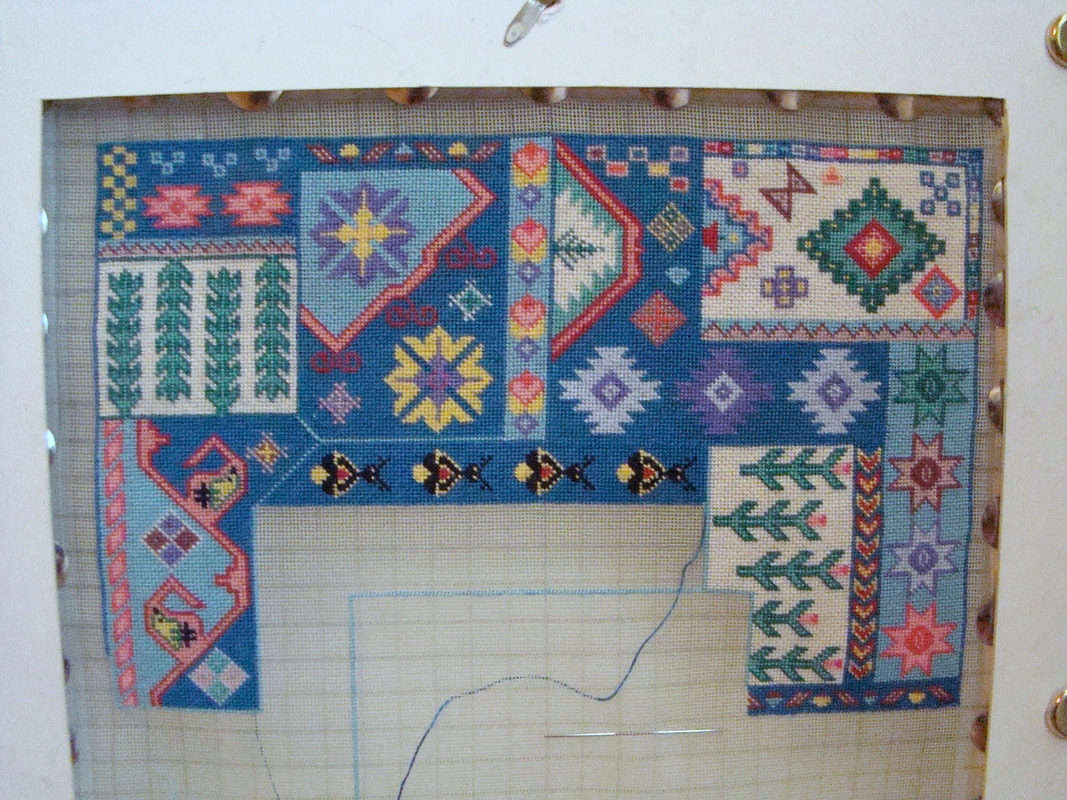 April and May's installment completed. We were given both parts of the pattern at once this time. Choosing the colors was a lot of fun and everyone's rug looked so different.
 There are times that I find designing to be very relaxing and therapeutic. When I find myself awake in the wee hours of the morning, I can design and help myself relax.
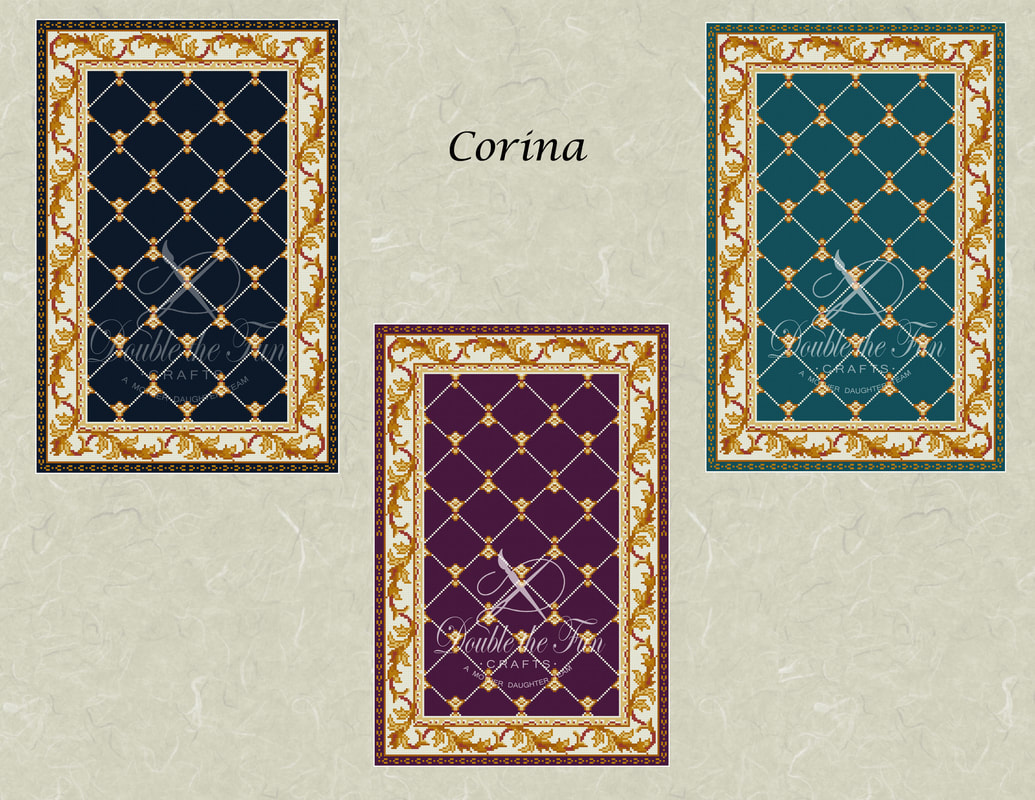
When designig this rug, I couldn't decide which color scheme I liked the best so kept them all! The Corina Rug has 6 different color options included in the pattern so that anyone who purchased the pattern could see how it would look with another color and customize it for themselves. Maybe they could be inspired to try another color altogether. The possibilities are endless! This one was inspired by a photo an antique rug I saw. I particularly liked the border and felt that it was fancy enough that the center should be fairly plain. 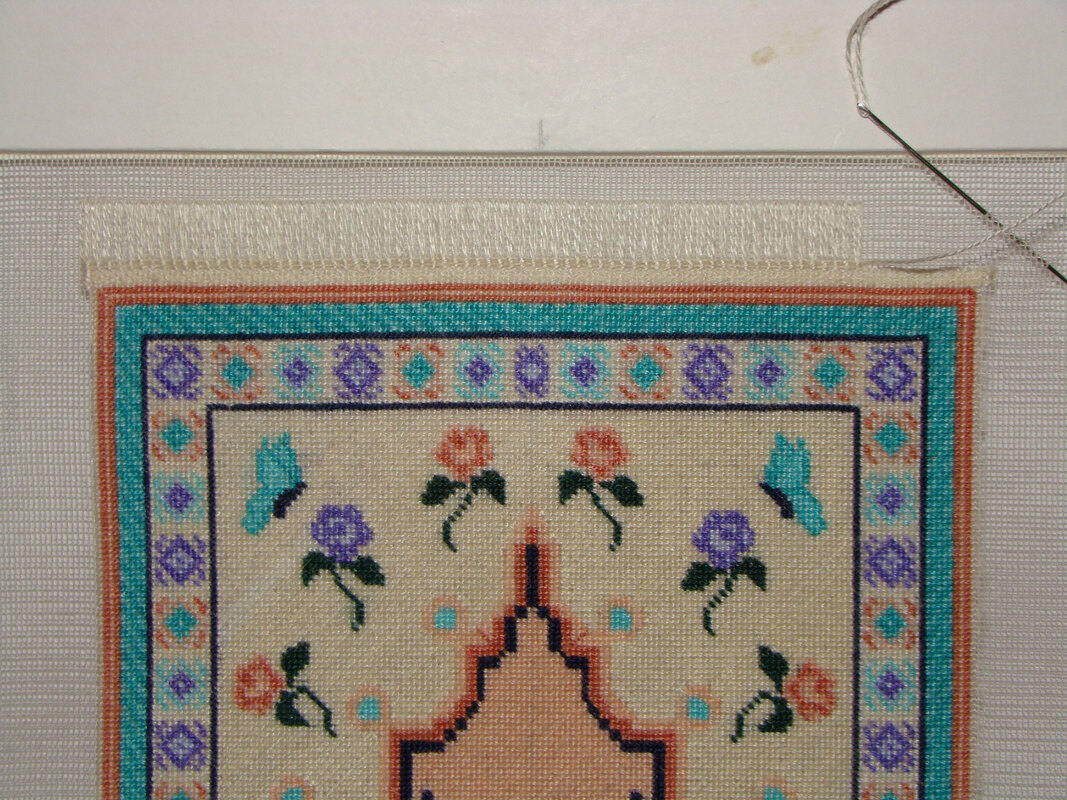 As part of my learning curve in miniature Petitpoint, I decided that this rug needed a fringe. Not all rugs have fringes and it is often at the discretion of the maker to decide if they wish to add a fringe or not. There is a wonderful tutorial on the website of a fellow Petitpointers@groups.io member and designer that I followed to create this fringe. It was easy to follow and my fringe turned out beautifully. Here is a link to the tutorial: petersonpetitpoint.com/index.php?main_page=document_general_info&cPath=10&products_id=129&zenid=b8d7522f81b57ccd4060d5c74de513e9 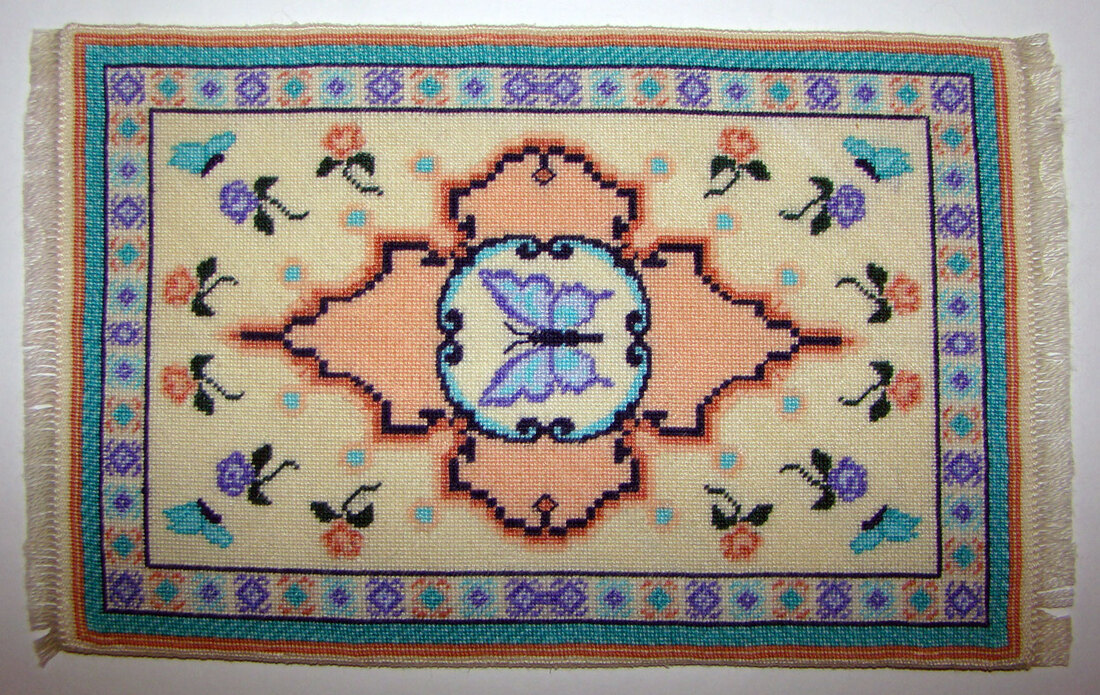 Here is the rug after the fringe was put on and it has been blocked. All rugs should be blocked once it is removed from the frame to help get it perfectly straight. As I look at the picture for this rug, I see that it isn't perfectly straight so I will block longer for my next rugs. A wonderful tutorial regarding blocking a rug is also available at the same website mentioned above. Here is the link: petersonpetitpoint.com/index.php?main_page=document_general_info&cPath=10&products_id=128&zenid=b8d7522f81b57ccd4060d5c74de513e9 After blocking, I finished off the sides of the rug by using an overcast stitch over two threads. Below is a photo of the rug completed and in its place of honor in my dollhouse. Not bad for a first attempt! The members of Petitpointers were very supportive of my learning attempts and were very happy to answer all of my questions. I am extremely grateful for their assistance.  I learned a lot while stitching this rug in regards to the type of stitch to use when doing Petitpoint. The stitch is different than Cross Stitch in that it only slants in one direction on the front instead of forming a cross. There are a few different types of stitches that look the same in the front but are different in the back. I spent some time reading about the different stitches on www.needlepointteacher.com/stitches/ which is a wonderful site that shows many different stitches that are done for needlepoint. The stitches are catalogued alphabetically so are easy to find. The ones that are used primarily in Petitpoint are the Basketweave stitch and the Continental (or Tent) stitch. Tent stitch is often used to stitch lines and small elements, whereas Basketweave is often used to fill in larger areas such as the background. Some people feel that only Tent stitch should be used in petitpoint, while others like a combination of both to help prevent the rug from skewing in the direction of the stitches. Sometimes a half cross stitch is used but it doesn't cover the back of the gauze as well as the others. Below is a photo of the Butterfly rug finished and awaiting the addition of a fringe. 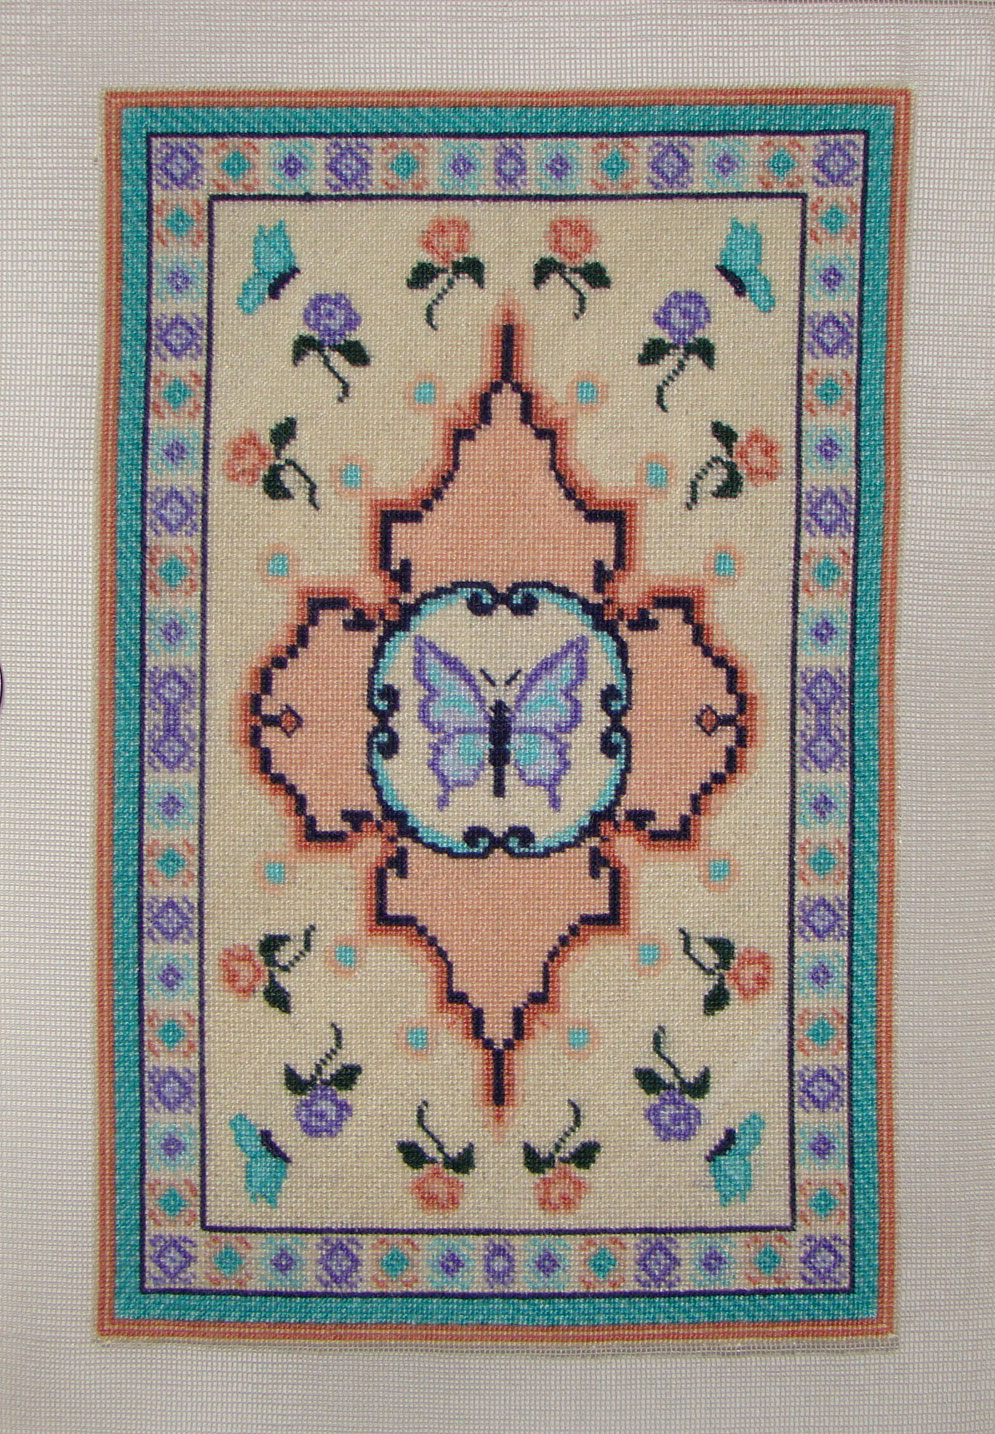 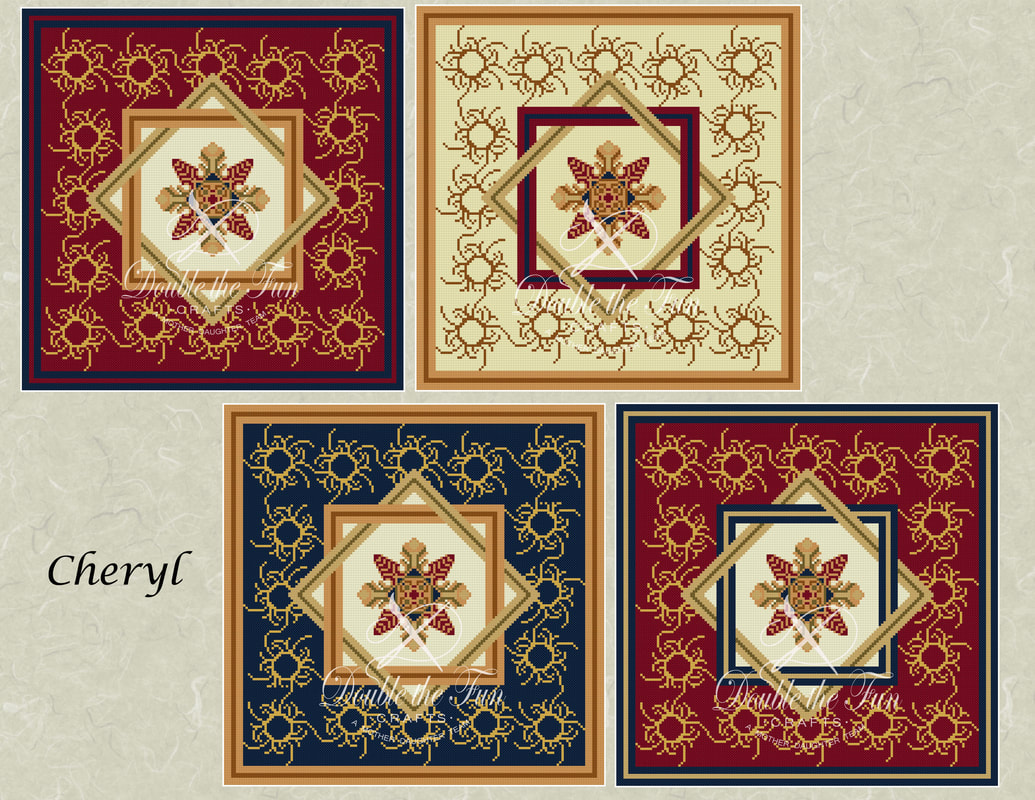 As I became more familiar with my new design program, I experimented with changing the colors of the rugs I designed. This one has several design color variations to tempt you to stitch and the possibilities are endless! Any of the rugs can be done in any colors and I invite you to try your own colors when stitching one of my rugs. I also joined an online Petitpoint group who helped encourage me to continue designing and stitching my projects. If you are are interested in Petitpoint and would like to join an online group of wonderful people who are interested in the same thing, check them out.
I decided to name my rugs with a female name and once my two daughters found out, they insisted I name one after each of them. This one is named after Cheryl and the inspiration for it came from several different sources. The interlocking squares were something I saw in a wooden floor and the center came from a photo of an antique Kashan style rug I saw. 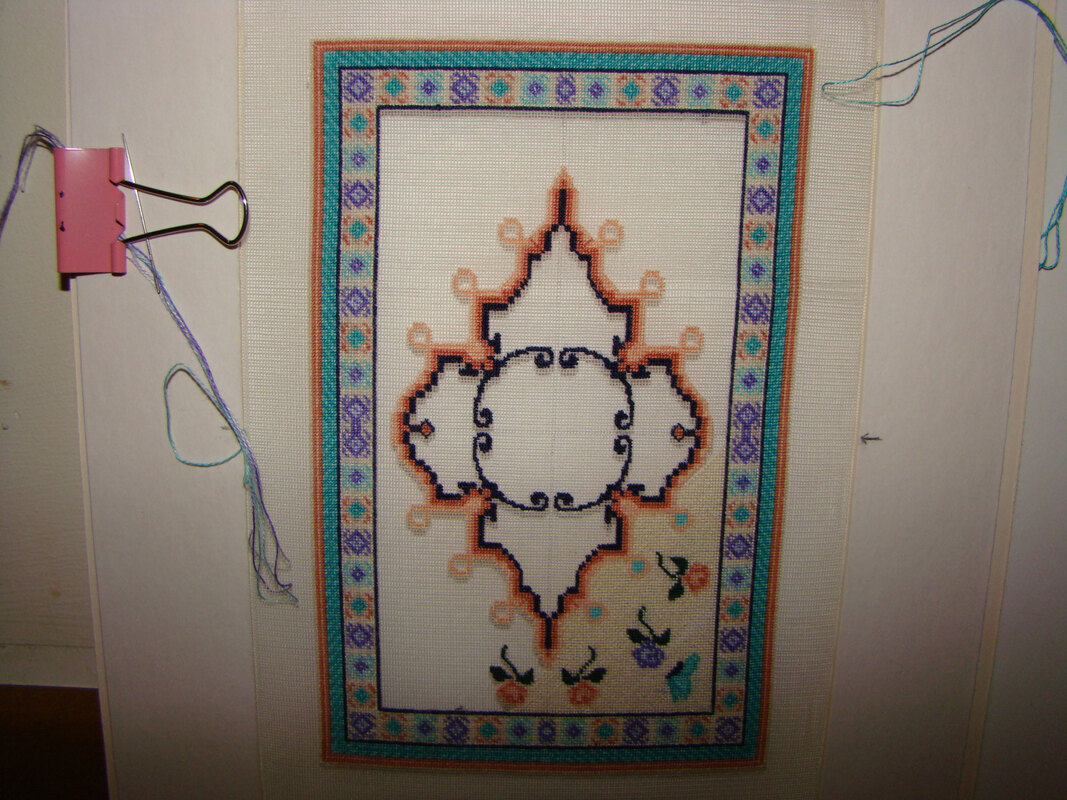 In January 2018, I began stitching my first dollhouse rug. I started with 40 count silk gauze and found that it was very easy to see because the threads were quite thin so the holes were much larger than the usual evenweave cross stitch fabrics I was used to.
This rug is of my own design and was designed to grace the floors of my dollhouse which I named "Butterfly House". This pattern will not be available on my online store because there are elements in this design which are not my own. Never-the-less, I really enjoyed putting this design together and stitching it. You may notice that I don't have the gauze on a wooden frame. Someone from the Petitpoint group I belong to suggested that I use heavy matboard and tape it in place. I did this and put another piece of matboard on the back to hold it more securely. I found I really enjoyed using a frame that was so lightweight. It was very easy to hold and to take with me on long car rides! Since I didn't start this blog until December 2019, I will be posting progress photos in order until I have caught up with my current project. Hope you enjoy reading about my journey as much as I enjoyed living it. As I became more familiar with my new design program, I ventured into creating more complex rugs. These three rugs were inspired by photos of antique rugs. Denise is a very intricate rug and I look forward to stitching it someday. When I design my rugs, I choose a set of colors that, to me, look good on the screen. Once I am done designing it, I then turn to my DMC color chart and carefully check each color to make sure it doesn't clash with any of the ones that will be around it. I change colors as needed and sometimes enlist the help of Cheryl, who has an art degree and understands the color wheel so much better than I ever will! 🙂 I also try to make sure that colors don't get lost when stitched next to another color. Sometimes a color can have the same shading intensity as another and, therefore, disappears beside the other color. At times, a life sized rug is too intricate to translate completely into a miniature rug so I eliminate some of the elements to make room for some of the others. 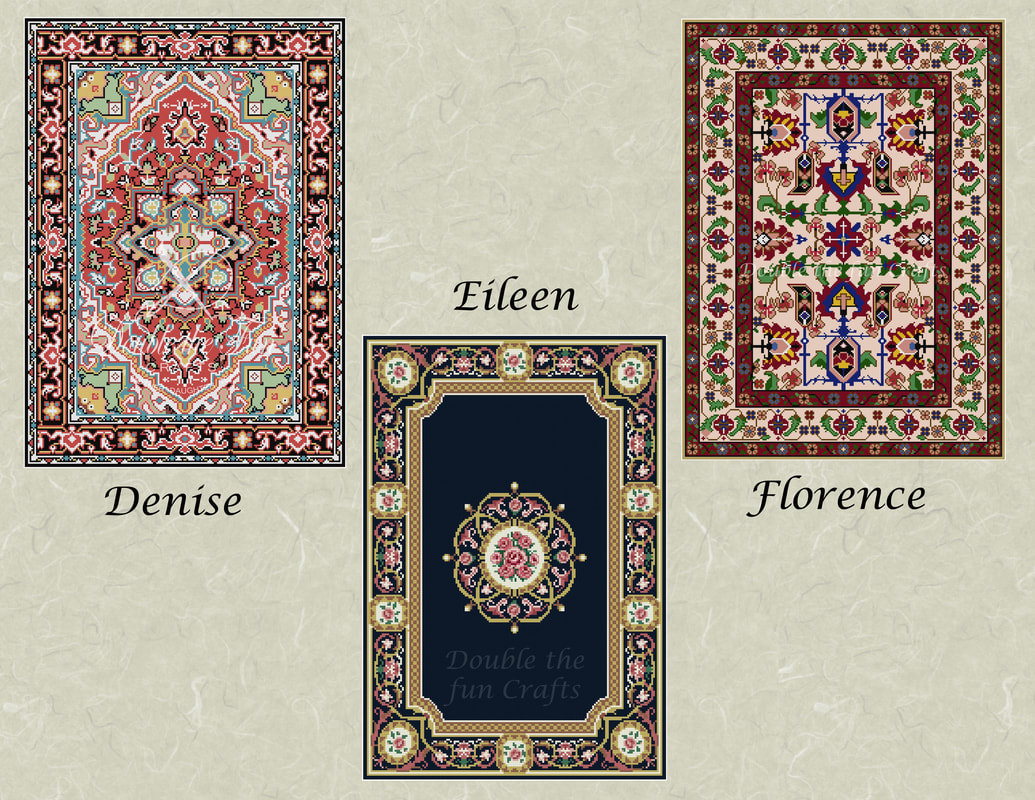 Here are some of my first designs, started when I first recieved my computer design program. It took awhile to learn how the program worked but I caught on eventually. When I first started designing rugs, I used a picture of graph paper and painstakingly colored each square on my computer. I then found out about a program that was specifically used to design for Cross Stitch and my creative process became so much easier after that! All of my designs are suitable for 1:12th scale dollhouse projects when stitched on 40 count silk gauze. However, they would be suitable for any scale depending on the size of gauze you choose to use. Inspirations for these rugs came from photos of antique rugs. Amanda is done in the Aubusson style, while Belinda is in the Scandanavian style. So far, most of my rugs and cushions are designed for 40 count silk gauze because this is the one I am most comfortable working on. I may start designing for other counts of gauze later as I begin to stitch on them. 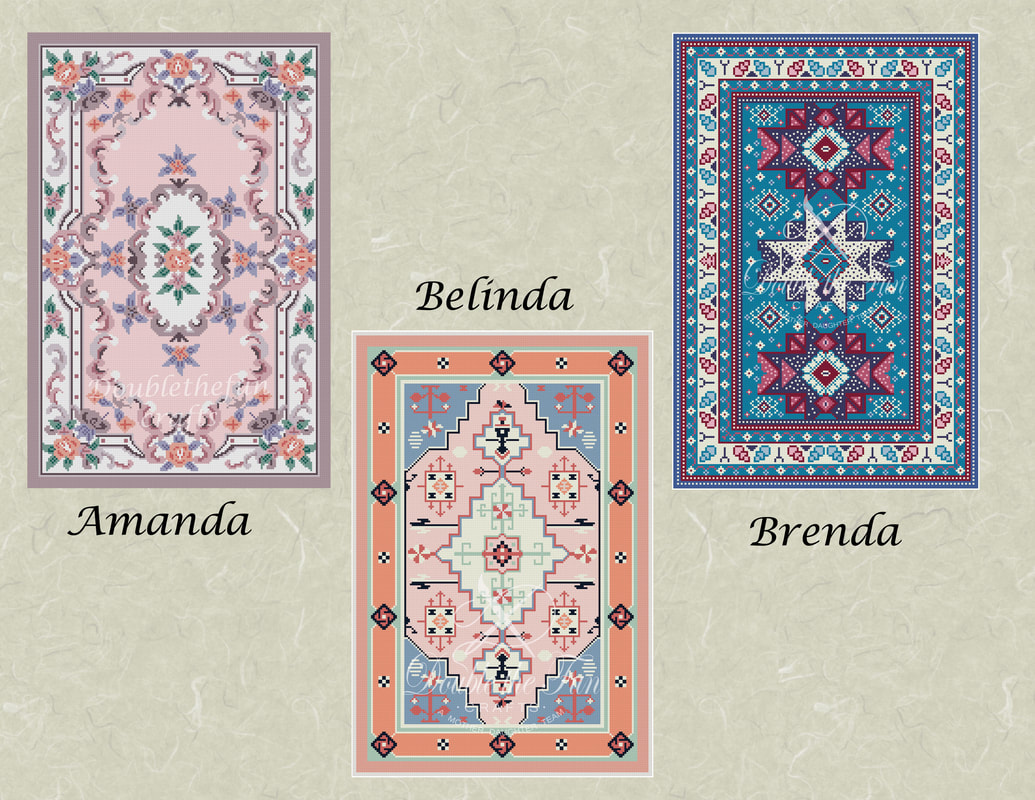 |

AuthorMy name is Yvette, and I will be writing this blog to tell you about the creative process that has gone into the creation of my Petitpoint patterns along with showing the stitching I have done of some of the rugs. Archives
April 2024
Categories
All
|
 RSS Feed
|
Thank you so much for visiting our site. We hope you come back soon!
|
We promise not to spam you with emails and will only send out the occasional email. We promise not to share your email address with anyone and it will only be used by Double the Fun Crafts for the purpose of promoting our products or letting you know of a sale.
|