|
|
|
We have shown this tutorial in long form for you to read on the site and also have a free downloadable PDF version for you to keep for future reference. Please do not copy, sell or post this tutorial on your own website, but you may mention it and link back to it here if you wish.
Tutorial #1: Mounting your Silk gauze and beginning to Stitch
Silk gauze is often used for petitpoint projects and is quite easy to work with as it has thin, strong silk strands. The thinness of the strands allows the holes to be larger than they would be if using a fabric like linen or Aida cloth.
|
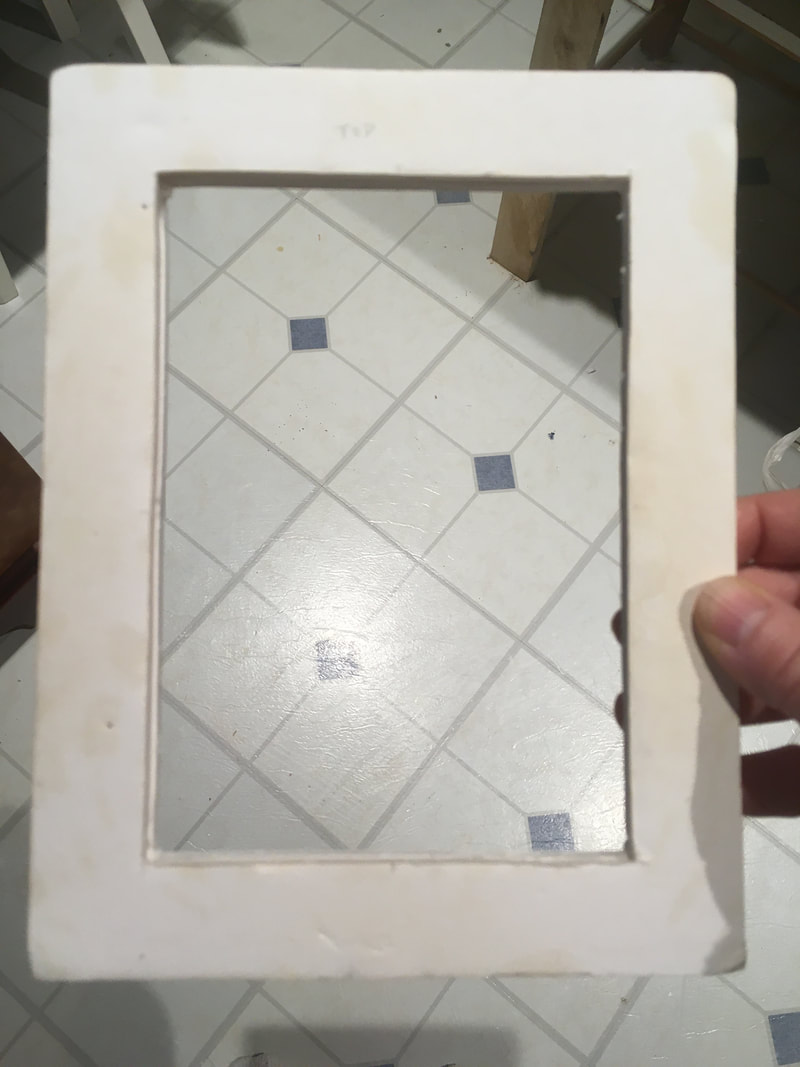
It is often easier to stitch the silk gauze when it is mounted onto a frame. There are many types of commercial frames available, ranging from wooden to plastic, but I tend to use foam core because it is fairly inexpensive and I can easily cut it to the size I wish to use. I can only get ¼” thick foam core where I am, but I am told there is also a ½” thick version. If you can get it, I would recommend the ½” version. Since I cannot, I do the next best thing and glue two layers of ¼” foam core together to get my thickness. I like it thick as I use thumbtacks to hold my gauze in place. Here is an example of my foam core frame on the left. I like to make the inside hole of the frame about ¼” – ½” larger than my stitched rug on each side. The sides of the frame are about 1” wide. I also write the inside dimensions on my frames so that I can easily see if it will fit the rug that I wish to stitch. Therefore, when cutting out the gauze, I cut it approximately 2” – 3” larger than the finished length and width of my rug. If I wish to add a fringe, I cut the length of the gauze at least 3” longer than the finished length of the rug. This is due to the fact that you need extra gauze to secure it to the frame and to help with blocking and finishing the rug. If you cut your gauze too small, it can be very difficult to block it or you may not have enough to add a fringe. |
|
|
When applying the silk gauze to the frame, I like to secure it in one top corner with a thumb tack. Once this is done, I stretch it downwards towards one of the bottom corners. I look carefully at the gauze and try to follow one line of holes down the inside edge of the frame, so that I can see it is straight before I put in the second thumbtack. Stretch slightly when adding the thumbtack. Next, stretch the gauze across the top width to the other top corner and check the gauze to see if the inside edge of the frame follows one line of the gauze. Add your third thumbtack to the top corner. Secure the fourth corner the same way. Add thumbtacks down each side and across the top and bottom to secure the gauze tightly to your frame (as many as you would like), stretching slightly as you do so. When finished, the gauze should be fairly square and tight. Tip: I sometimes draw a light line on one side of the gauze or weave a long waste thread in and out along one line of holes before mounting it onto the frame, approximately 1” in from the outer edge. This line can be used to mount the first side straight by giving you a visual reference to follow. If you aren’t absolutely perfectly straight, don’t worry too much because you will be blocking (tutorial for blocking found on my website) your piece before you do the final finishing. Just get it as close as you can so that you will be able to stitch the whole piece without worrying that it will run over the edge of your frame while stitching it.
|
|
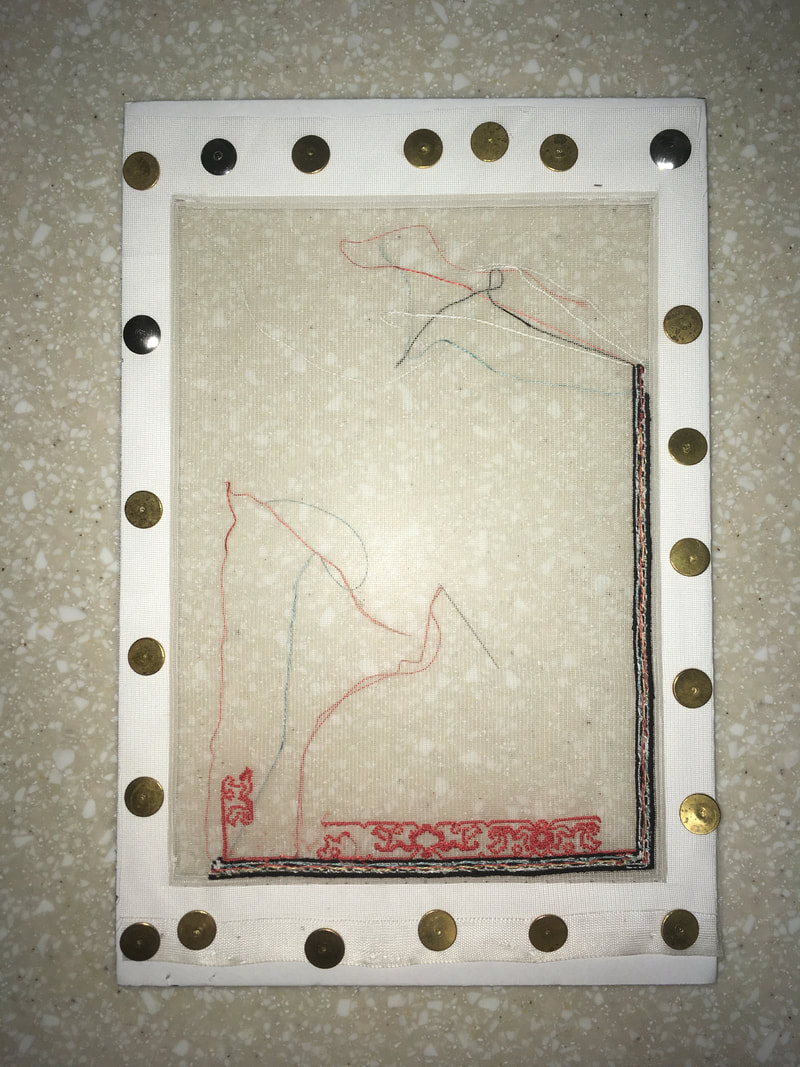
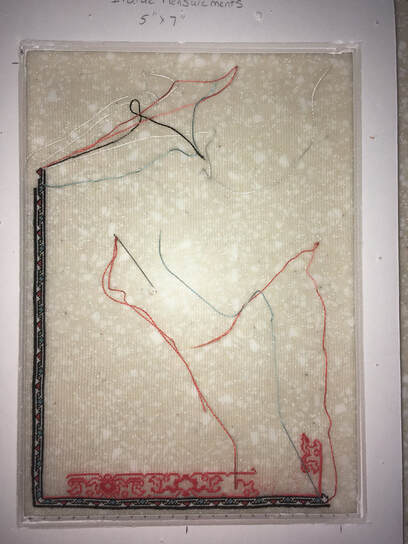
When I begin to stitch my projects, I position the frame so that the front of the work is the side where you don’t see the thumbtacks. This is a tip that was given to me by someone else in order to help finish off threads when near the edge of the frames. I also often mark the center of all four sides with a pencil mark on the frame. I then measure out the dimensions of the rug and mark them on the frame in pencil as well. This helps me determine where to start my stitches.
In the photo above, you can see that the inside measurements are 5” x 7”. The finished dimensions of this rug will be approximately 4 ¼” x 6 ½”. Therefore, the inside dimensions of the frame are approximately 3/4" extra for the width and 1/2" extra on the length. I measured my starting point out a little differently by deciding to begin my stitches in the bottom left corner, approximately ¼” in from the corner of the frame. After choosing my starting point, I marked it by putting my needle into my starting hole, then measured across the bottom from that point and marked the center of the rug and the far-right corner with pencil. I also measured from that point upwards along the left side and marked the top left corner on the frame so that I can see that it will definitely fit within the inside dimensions of the frame. |
|
|
There is no right or wrong way to begin stitching. Some people like to start in the center of the pattern and work their way outwards, and some like to start in a corner and work their way across the rug. If you like to start in the center, I suggest marking the center of each side of your frame, then running a long thread horizontally in and out some of the holes at the center mark on the left (or right, depending on whether you are left or right-handed), across to the right side, then doing the same vertically from your center mark. The center of the rug is where the lines intersect. The waste thread can be removed after you have begun stitching in the center. If starting in the center of your project, it is also a good idea to cut the inside opening of your frame at least ½” - 1” wider and longer than your finished dimensions. I am left-handed and like to start in the bottom left corner of the project and work my way up and across.
|
Because I start in a corner, I don’t have to cut the inside opening as large as I would if I started in the center, because I can be sure with my measurements that my project will fit. (As described in the paragraph above this one).
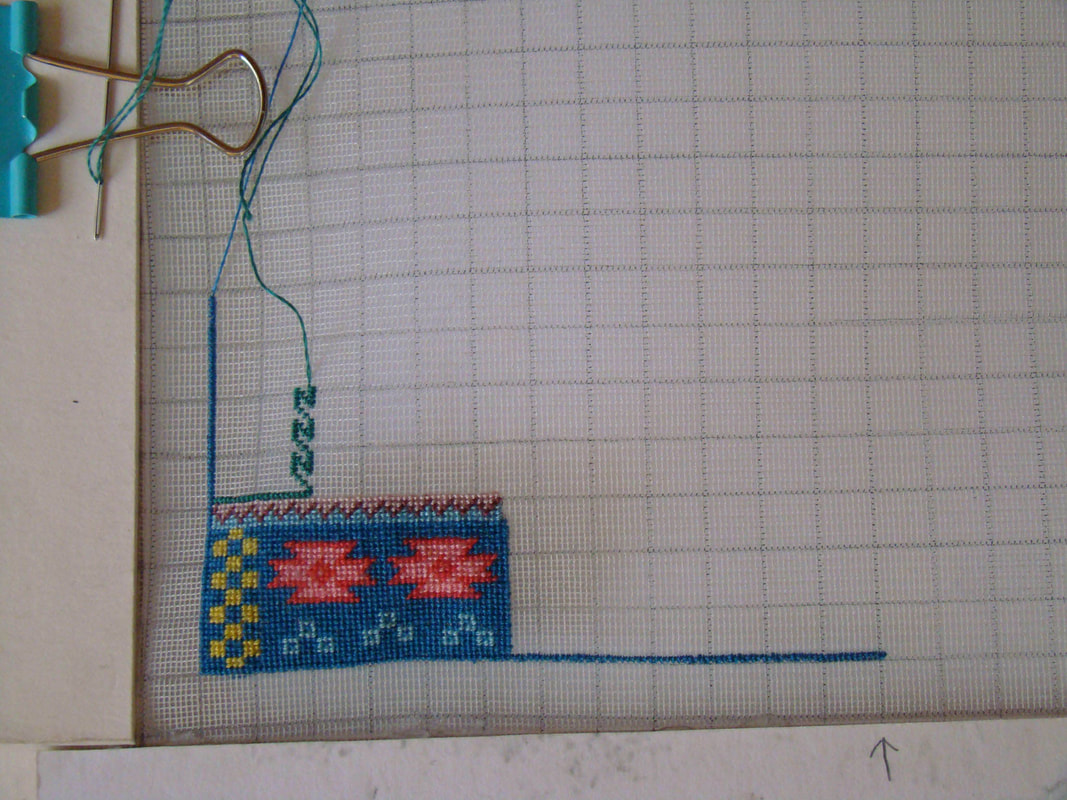
The photo above shows the beginning of one of my first petitpoint projects. I had a hard time seeing the lines on the gauze, so I carefully marked every 10 stitches with a quilter’s pencil to get a grid pattern that matched the grid on the pattern I was following. To do this, I tacked my gauze down onto a firm surface then put a vertical pin into one hole on the gauze. I carefully used another pin to follow the line of holes from my first pin across to the other side of the gauze, then pushed it vertically into the hole of the gauze. I used these pins as the guide for my ruler, then drew a line between the pins. Then I moved the pins down 10 stitches and repeated drawing a line. As you can imagine, this was very time consuming but well worth it in the beginning. Once my eyes were used to seeing the holes better on the gauze, I stopped doing this. Also, I found out the hard way that the lines could be seen through light colored stitched areas and I had to wash my project before blocking it. The project was very difficult to block after washing it, so I determined that the pencil lines should only be used when stitching with dark colors, then you don’t have to wash it to remove the lines.
|
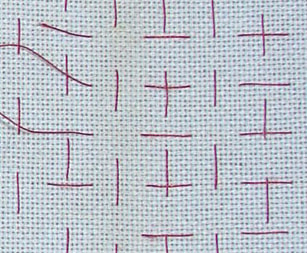
An alternative to marking your gauze with pencil would be to use waste thread and stitch your grid across and down. This is an easier way to do things in the long run because the waste thread can be removed as you stitch. Here is an example of a waste thread grid that I did on a high-count linen for a cross stitch project I was working on. The same idea can be used on silk gauze.
|
|
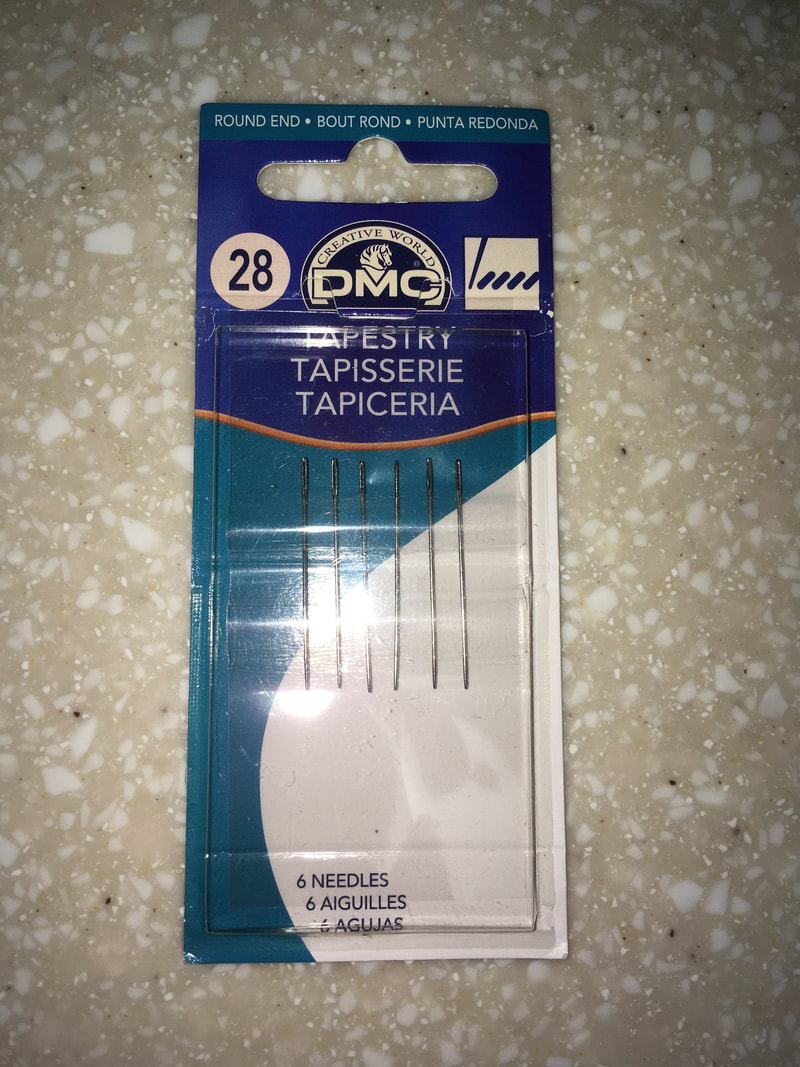
Another question that I often see asked is what kind of needle to use when stitching. There are two basic kinds of needles and it can be your preference to use one or the other. The first kind is the sharp one you use when doing ordinary sewing. The eye of this type of needle is small and often hard to thread. The sharp end can split the thread when stitching, but sometimes makes it easier to stitch because it goes into a hole that already has a stitch in it much easier. The second kind of needle is a tapestry needle. Generally, tapestry needles are the preferred needles to use because the eye is larger, thus easier to thread and the tip is not sharp. This helps because when stitching Petitpoint, you usually stitch using a stabbing motion through the individual holes (pushing straight down through a hole then pushing straight up through the next hole), rather than a sewing motion. With a sharp needle, you can easily stab yourself doing petitpoint. My preferred needle size is a Tapestry #28. The needles shown are the ones I usually buy, simply because they are readily available at my local store. #28 needles are suitable for high counts of silk gauze as they are very slim. |
|
When I first began doing petitpoint, I would begin my stitching using a waste knot. A great description of the use of a waste knot can be found here: https://www.needlepointteacher.com/start-end-a-thread/ I use Tent (also called Continental) and Basketweave stitches to complete my rugs. I use these stitches primarily due to the fact that I have read that it helps to keep the rugs square when stitching them and help prevent the rugs slanting to the side due to stitches pulling. (I am not sure how true this statement is because virtually all of my projects have a slant to them when I remove them from the frame.) If you have never done Tent or Basketweave stitch, I suggest you do a search on the internet as there are many sites that describe these stitches better than I could. A site that I found very useful when learning was Needlepointteacher and the two pages that describe these stitches can be found at these links: https://www.needlepointteacher.com/stitches/numbered-a-b/basketweave/ and https://www.needlepointteacher.com/stitches/c/continental/
These two stitches look the same on the front of the work but look different on the back. Generally, I use Tent/Continental stitching for outlining and straight rows of stitching and Basketweave for the background. If you are working with an overdye thread to get an “abrash” effect, you must use Tent/Continental stitches for the background as well. This effect can be seen on my blog in the Heather rug, located here: https://doublethefuncrafts.weebly.com/yvettes-petitpoint-blog/category/the-heather-rug .
Below, you will find the free downloadable PDF. Simply select "Download File" then save to your computer.
| mounting_silk_gauze_and_beginning_to_stitch.pdf |
This concludes the first tutorial. We hope you found it useful and clarifies a few things for you. You may use this link to access the second tutorial if you wish.
|
Thank you so much for visiting our site. We hope you come back soon!

|
We promise not to spam you with emails and will only send out the occasional email. We promise not to share your email address with anyone and it will only be used by Double the Fun Crafts for the purpose of promoting our products or letting you know of a sale.
|