stitching of the center very soon. The nice thing about this pattern is that I am not repeating the same design after I pass the halfway mark, so it should continue to be interesting until the end.
0 Comments
helping to make the symbols look more like the originals. This is by no means the only way to stitch this pattern. It is the way I have chosen to stitch it. There is noting wrong with keeping all of your stitches slanting in the same direction all of the time. (In fact, most people would tell you that you can't change the direction of your stitches - I choose to ignore that because I like the way this looks)
Most likely, this border will take me a while to finish, but you will see it sooner as I have been trying to catch up on my blog posts since being away, and a new post will be showing up once a week until I am caught up. For example, this post comes one week after the last one, but in reality it took me almost a month to get this far after the photo in the last post.
This would leave the opposite side of each motif empty. When I got all the way around, I did the same thing around the rug, stitching the other side of each motif and the unfinished single stitches. You can see some of the empty sections remaining on the bottom left side of the photo. As you can see, the empty sections are alternating down the side. This way of filling in these motifs has two advantages - 1) it uses less thread and 2) it doesn't make the rug thicker by carrying thread across the motif.
When I showed this photo on the online stitching group I belong to ([email protected]), someone asked me a very good question: Do you actually count the hundreds of stitches for the border? Not at all. That would be way too difficult. I usually place a few stitches in the corner of the outermost border, then count inwards diagonally from the corner to the first section that has a pattern. In this case it was 6 rows in from the outermost row. I then work the patterned section around the rug, using the pattern to count my way around and make sure there are the correct number of elements on each side before I get to a corner. I complete the patterned section so that I know everything is correct and then I stitch the outer, boring rows to get some of the boring parts out of the way before I start on another patterned section. The great thing about this approach is that I know every row I do from now on is smaller than the last, lol. The small patterned section on this rug is hard to see in the photo but shows up very well in real life. Do you sometimes get bored with sections of a rug when you are stitching? I know I do. I often find the plain rows on the outermost border and the background of a rug to be the most boring part. I decided long ago to try not to have a lot of that to do at the end of stitching one of my rugs because I would find it so difficult to finish. I would be thinking all the while of the new rug I want to start and would most likely put the current one aside so I could start a new one. In the beginning of stitching a rug, I am still excited about stitching it, so I try and complete some of the boring stitching right away. I still have a few rows of the dark blue to complete before I start the more interesting, inner border, but I am determined to be disciplined and do this before I start the next section!
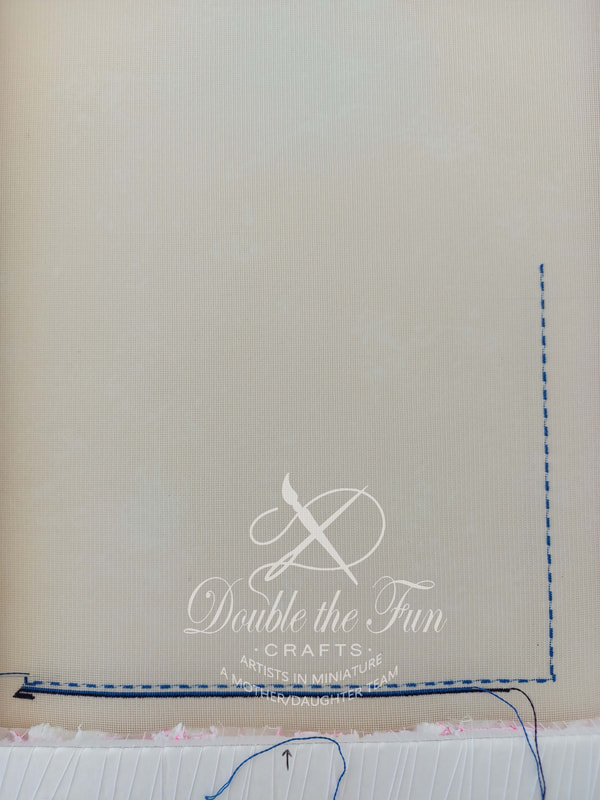
in from the corner.
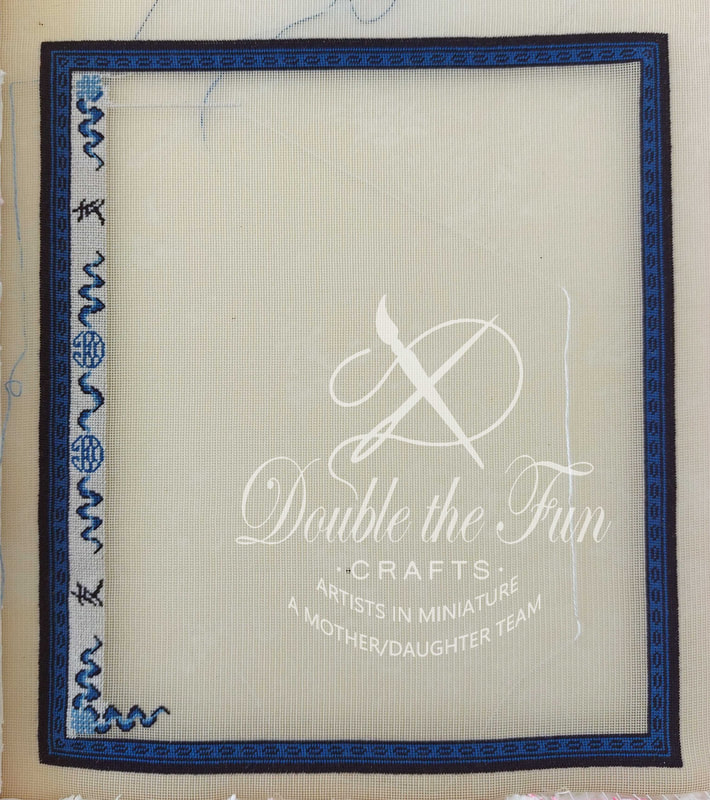
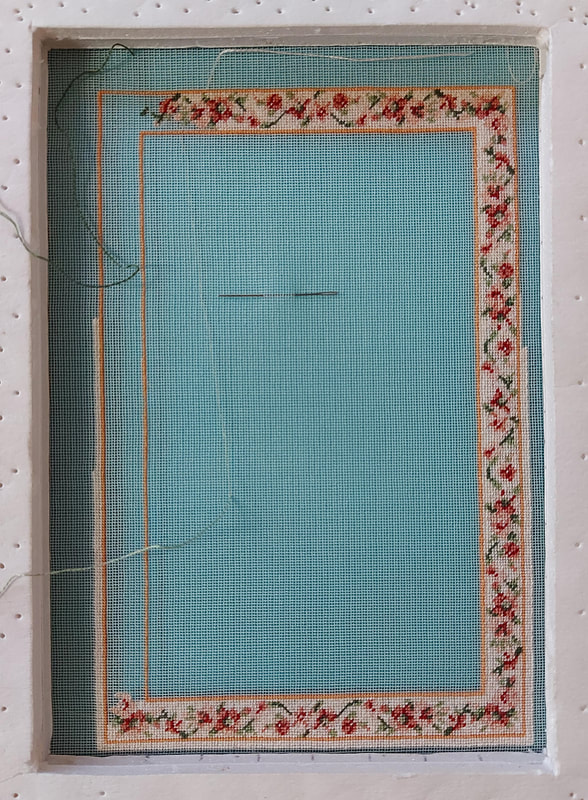
My first stitches were about 1/2" (1.25 cm) worth of stitches horizontally from the corner. (Bottom row in the picture). Then I return to the corner and finish one stitch before the end of the row. Then I stitched a stitch one stitch in from that and one row up to continue the diagonal I am forming. The outermost border is made up of 4 rows, so I stitched one more diagonal and continued the innermost row of that border across the canvas until I got within 1" (2.5 cm) from the right corner. I did not count, only measured with my measuring tape. I did not end the thread because I will be using it later to continue the stitching at that side of the rug. My next color brought me closer to the border I wanted to use to lay out my rug perimeter. As you can see, each row began 1 stitch up and over from the last row, to create a diagonal. I did not need to, but decided at this point to stitch across the rug again until I reached a similar point my last row did. You will see one blank row in the photo. This is to be dark blue, but I didn't want to start another thread, so I left it blank. Continuing on the diagonal, I finally reached the row where my pattern could begin. This row was very easy in that I stitched 4 stitches, left 4 blank and repeated across the row. At this point, I began counting the number of elements I had across the bottom row. In this case I had the corner element, 27 elements across the bottom, then another corner element. I find that I can easily count blank spaces (where the element will go) since I am not trying to count holes across the whole width of the rug. When I had the correct number of spaces, I stitched the corner element edges and continued vertically to reach the spot you see in the first photo before I ended my stitching for that day. I will continue in this fashion until my border has all four sides in place.
I tend to get lost sometimes if I stitch too much white at once because I can't see it as well against the white silk gauze. In order to help myself and prevent mis-counting errors, I stitch a certain distance (it never seems to be the same amount) then fill in some of the background. I work background up to an element, then stitch that element. This way, I can make sure each element is in the correct position before I get too far in my stitching.
I find this uses much less thread and eliminates the need to carry a thread across a light color. The photo above shows what I am speaking of. This method has come in very handy when stitching this rug.
Now, to get back to stitching the rest of this fun rug!
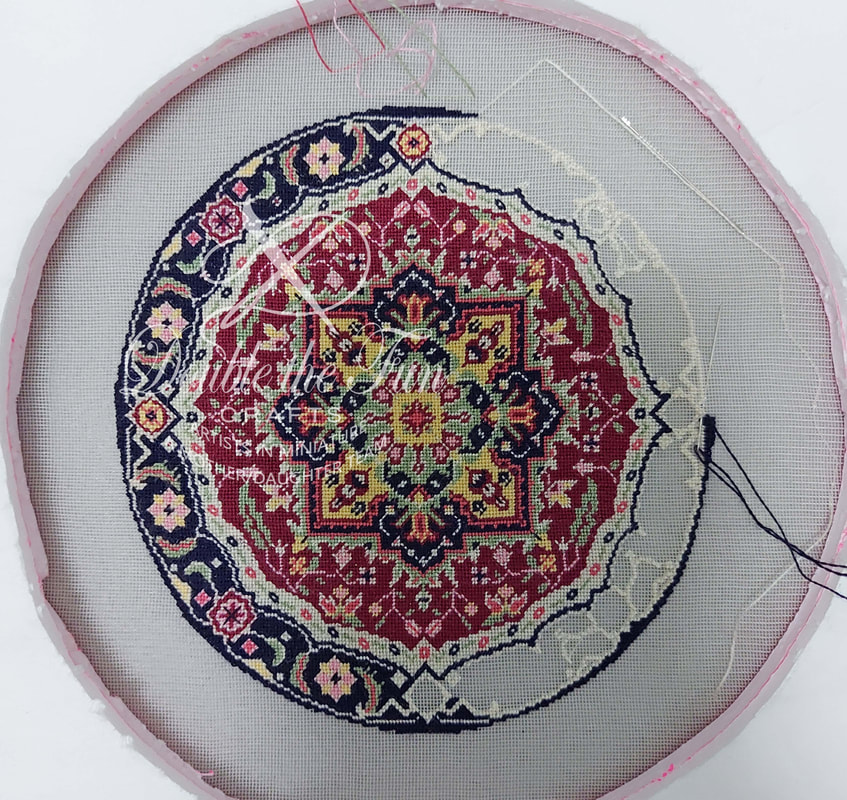
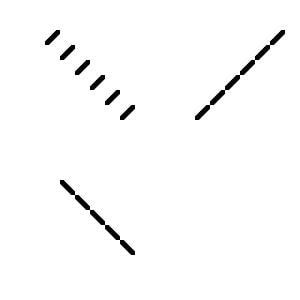
entirety before moving on to the next one. I think this is making it both easier and more fun for me instead of breaking the rug into top and bottom. I think I would get confused if I stitched everything from the middle upwards first then do the middle downwards after. When stitching it around the circle, I can also easily remind myself to turn the stitches the opposite way for design elements in opposite corners. I have never turned so many stitches in a stitching project before, and I think it is working out well because I am trying to keep the lines going as a line rather than looking like a "railroad track". Since I know words can sometimes not convey what I am trying to say, here is a photo depicting what I mean:
Since I am stitching this in Petit point, this really shows up when stitching lines. It would not make a difference if stitching the pattern in Cross Stitch or French Knots. Most of the time, I don't need to turn my stitches and many people never turn them (it is not usual to turn them), but I felt the rug would look better if I did.
I have decided that since it is Boxing Day and all of my company has now left, I am going to give myself a stitching day. I am eagerly looking forward to seeing more of the rug take shape!
I also tend to keep sections of thread that I have used but have finished off "parked" at the top of the canvas, out of the way so that I can easily pick up that thread again when needed. This, however, doesn't work if two threads are very close in color. On this pattern, I have the background and the lightest peach which are very close in color and I find it very difficult to differentiate the two. Therefore, I never park the lightest peach when working the pattern, preferring to end the thread and wind it back on the original floss bobbin. When working the first Katrianna, I mixed them up frequently and had to take out the incorrect color many times, so this time I am being more conscious of the two threads to prevent the same mistakes.
Have you ever seen a pattern you like but don't like the colors of it? I know I have! It is very common and not insurmountable. Changing colors to ones you like better and match your own color scheme makes the design feel more like your own and can go a long way towards making your scene fit your own vision. Several of my patterns include different color schemes, simply because I kept thinking of other colors that could work. But how do you go about making a pattern match your vision? Recently, a fellow stitcher by the name of Martha S, chose one of the rugs that I have several schemes for, in yet another color scheme, showing that the pattern can be changed to almost anything to suit your own scheme. She has given me permission to discuss her journey into choosing colors to go with her vision. She chose the Sonja rug for her scene.
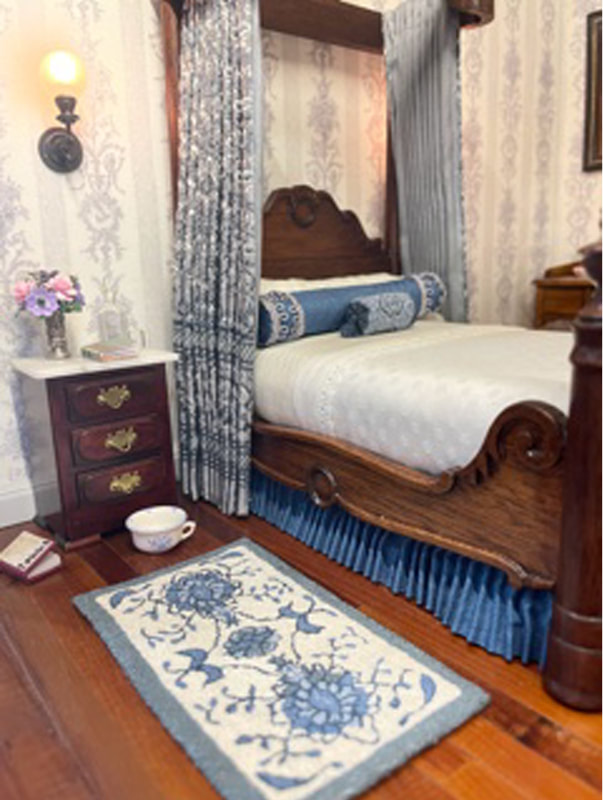
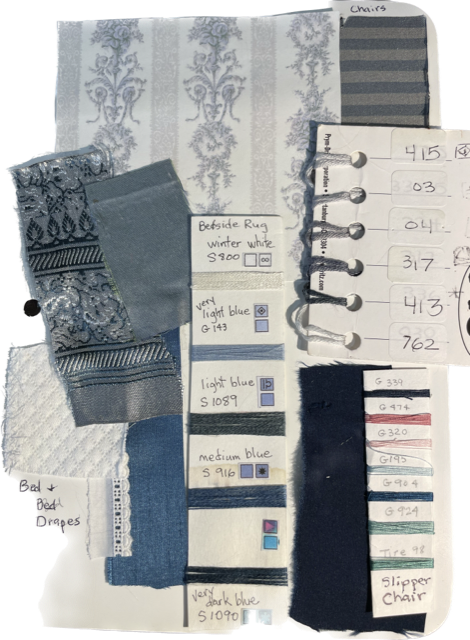 Above is Martha's storyboard. On the storyboard, she has samples of the fabrics and wallpaper that she eventually ended up using. There are 3 floss color cards that she has placed on the board. The one in the center shows the colors she chose for the smaller, French knot version of the rug she placed in the bedroom. The floss card showing the various shades of grey shows the colors she eventually chose for the larger version of the Sonja and the smaller floss card at the bottom right shows samples of threads she used in other stitching she placed around the room. This gave Martha an excellent way of matching colors to her current color scheme. As you can see, the shades of grey floss that she chose complement the greys she has in her fabrics and wallpaper perfectly. Martha asked another stitcher (Peggy B) to stitch the rug for her once she decided upon the colors and this is the finished product in place in Martha's dollhouse. 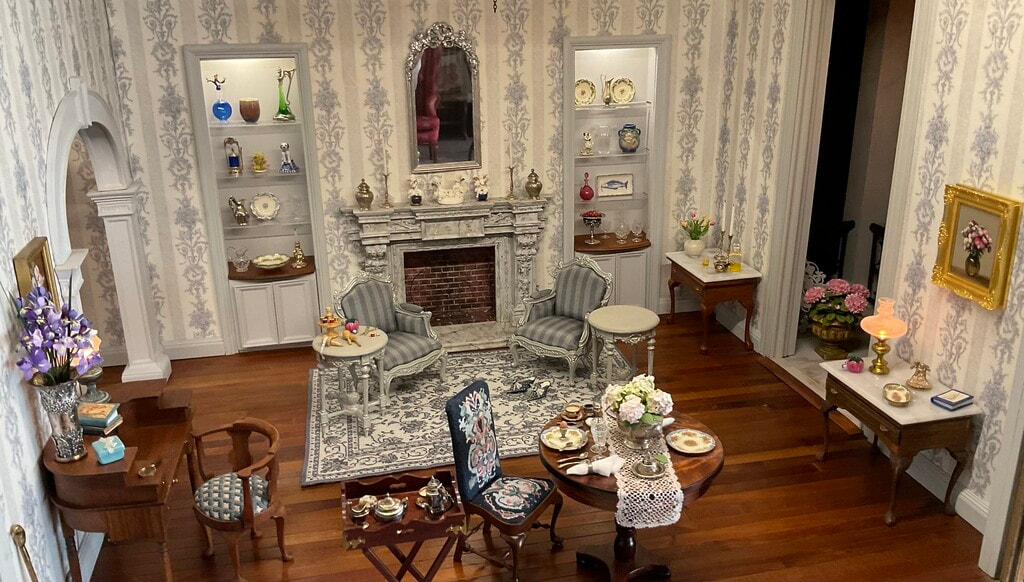 If you wish to change colors in one of my patterns, you could apply Martha's technique to help you decide upon colors. Make note of the number of colors in the pattern and be sure to choose the same number of colors for your pattern. You may decide to change only one or two colors to better match your scene, or you may decide to change all of them as Martha did. Changing the colors doesn't have to be hard and you can let your imagination soar using this method.
If any of you have stitched one of my rugs and changed the color schemes, I would love to see them. It is always fun to see what everyone has done with my designs. I hope this helped you and until my next post - happy stitching!
it in one go. As there isn't a lot of the palest peach, I also wait until I have a few flowers to fill in with that color before using it. This has helped me tremendously and I am making less errors now.
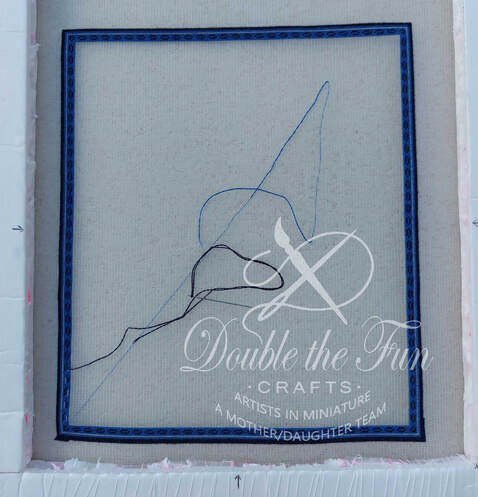
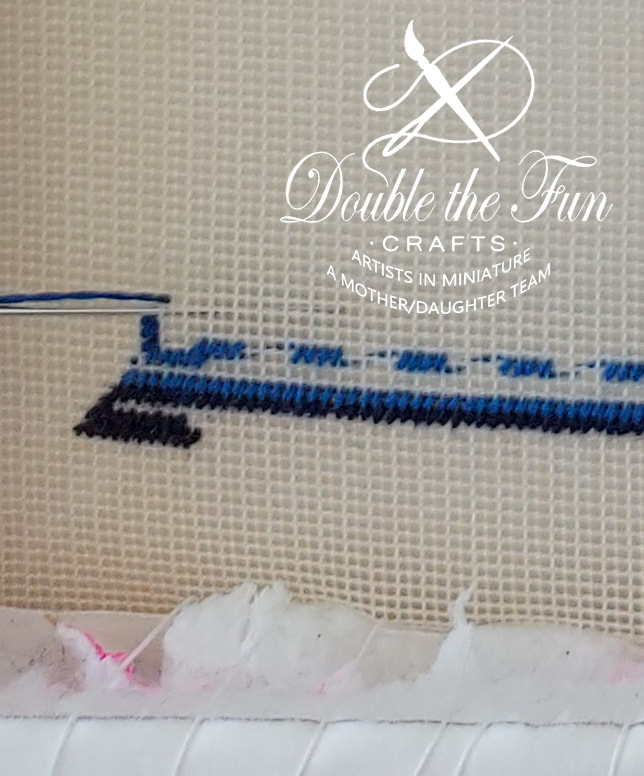
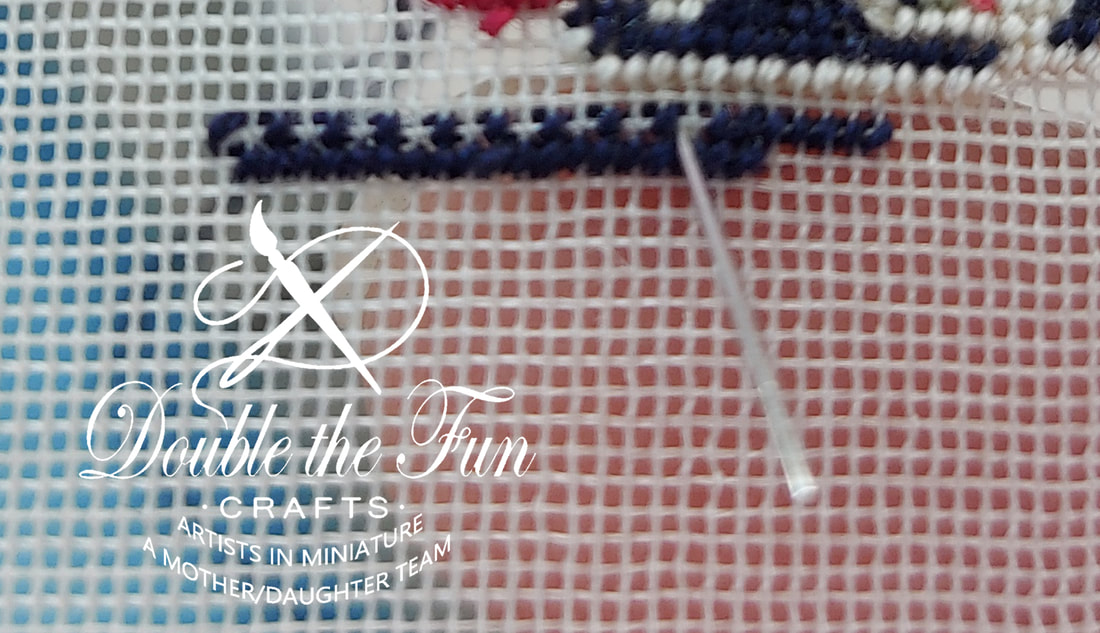
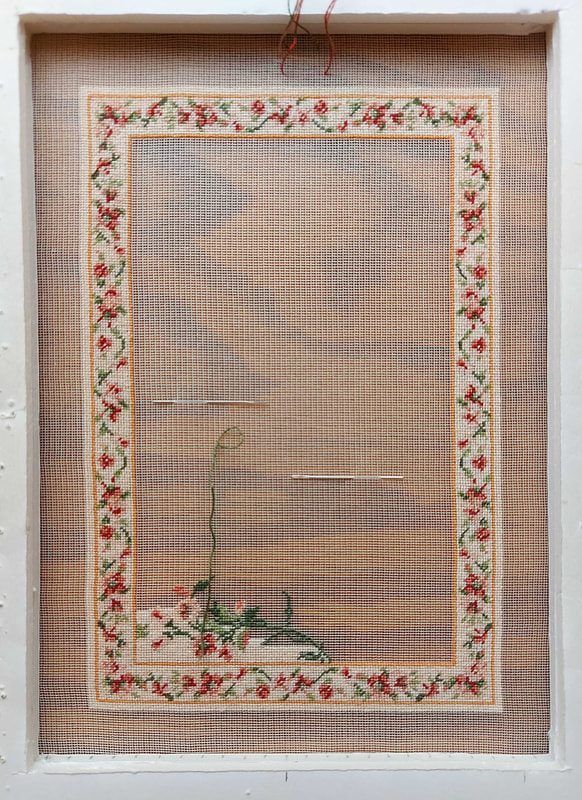
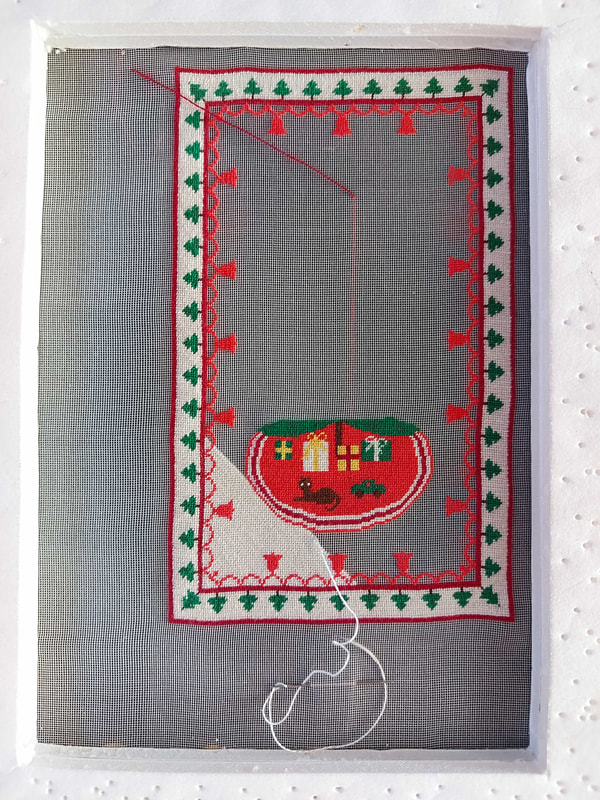
Tip* Another thing of note with this rug is that although it is easier to stitch the darker colors first, it is not the best way to do it. Dark colors show through the light colors if the light color is stitched over carried threads of darker colors. If you must stitch with a darker color first, make sure that no thread is carried across an empty space that will be filled in with a light color. It will take a bit more thread but always run the thread back through already stitched areas of darker color on the back before proceeding to a new area. If you have to cross an open area, park the thread (leave attached to your work and thread it into some holes away from the area you are working - this can be seen at the top of the photo above) then stitch the lighter color before picking up the thread again and crossing the area to get to the new dark area. I am greatly looking forward to finishing the border and beginning the middle. Hopefully by next week...
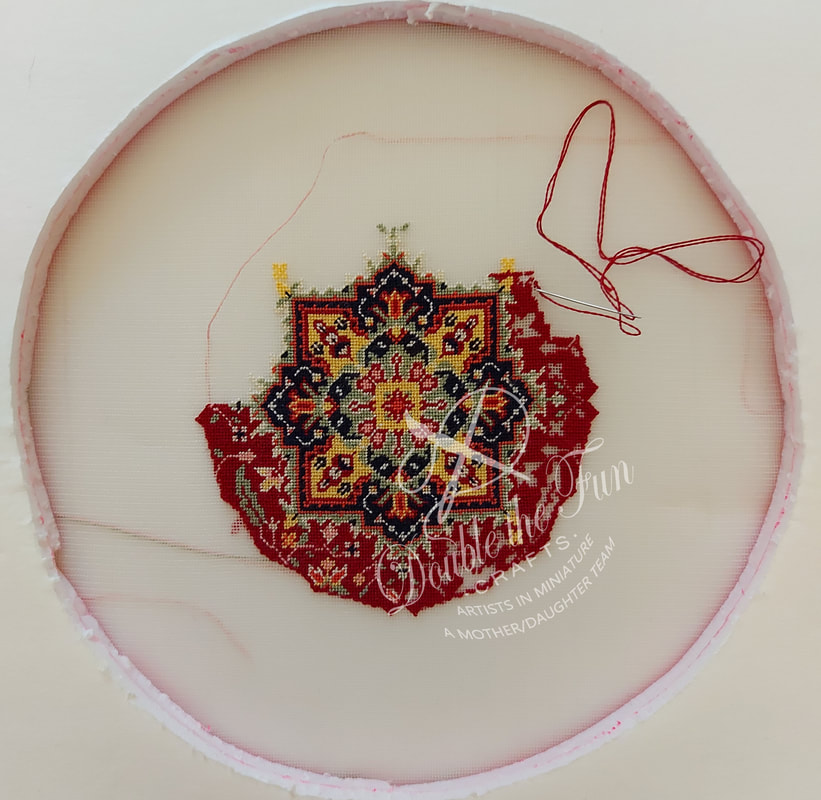
Near the top of the photo you will see a dark red thread coming out of the middle. This is called "parking a thread". I do this with my threads when I have stitched an element and will be using that color again near where I finished the element but don't want to carry it under my surrounding stitching, or count up to the next area it should be used. In this case I will be using the dark red in the garland that adorns the tree. Instead of finishing the thread and having to start again, I have saved it out of the way of my current stitching (the cream background) so I won't accidentally stitch over it and will pick it up again later when I begin the garland. I will have to move the thread later when I stitch more of the tree but, for now, it is out of the way.
This comes in very useful when you are stitching an area with many color changes. If you stop and start your threads each time you would have a very bulky back on your rug. Since it will be carried behind an already stitched area, it doesn't show from the front through the color you have stitched if that color is a darker color. It is still a good idea not to carry threads over a light area of stitching. If you do wish to stitch over it, simply park your thread in the direction you will need it again and stitch over it before picking it back up again to stitch with. Later, when I am done the rug, I will post a photo of the back of the rug for you to see. |

AuthorMy name is Yvette, and I will be writing this blog to tell you about the creative process that has gone into the creation of my Petitpoint patterns along with showing the stitching I have done of some of the rugs. Archives
July 2024
Categories
All
|


 RSS Feed
|
Thank you so much for visiting our site. We hope you come back soon!
|
We promise not to spam you with emails and will only send out the occasional email. We promise not to share your email address with anyone and it will only be used by Double the Fun Crafts for the purpose of promoting our products or letting you know of a sale.
|